
Your activity, into automation.




Note
Alpha ⟶ Things will break and change. Read VISION.md to understand what AutomatiQ is trying to achieve and where it's headed.
AutomatiQ records HTTP requests, Websocket frames, and your interactions for reverse-engineering your goal/intent into a standalone Python automation/extraction script without needing any manual inspection and unnecessary paid dependencies, or heavy dependencies like a browser during runtime.
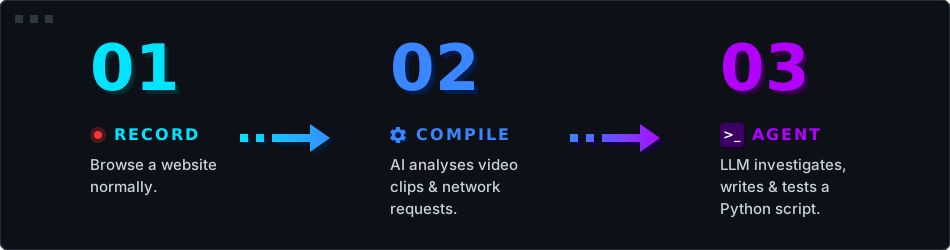
- Record (Browser Capture) ⟶ Chrome is launched with CDP instrumentation. Every network request, response body, cookie, WebSocket frame, and user interaction (clicks, typing, navigation) is recorded with timestamps. Press
Ctrl+Cwhen you're done. - Compile (Vision Analysis) ⟶ The recording is split into per-action video clips. A vision LLM watches each clip and produces structured annotations (what was clicked, what changed, whether the action succeeded). Network requests are decoded, deduplicated, and structured into a workspace dump.
- Agent (Sandbox Execution) ⟶ An LLM investigator reads the workspace dump, experiments in an isolated Python/IPython environment, and iteratively produces a working script. It can test hypotheses against the live site with guardrails against loops and repetition.
Requirements: Python 3.11+ and Google Chrome
pip install automatiqSet your API key (AutomatiQ uses Gemini 3.5 Flash by default, but any litellm-supported provider works):
# On Linux/macOS
export GEMINI_API_KEY=your-key-here

# On Windows (PowerShell)
$env:GEMINI_API_KEY="your-key-here"
Run the magic command:
automatiq run https://example.comThat's it. Browse the site, press Ctrl+C, and the agent takes over.
AutomatiQ offers three ways to operate depending on your workflow:
The run command records a session and immediately launches the agent to write the script.
automatiq run https://example.comIf you want to record multiple sessions, or run the agent later, you can split the process:
automatiq record https://example.com   # Opens the browser and records your session
automatiq agent                        # Builds an automation script from the last recording
automatiq agent --target path/to/sess # Builds an automation script from a specific recordingIf you quit the agent mid-way (or it hit the step limit), resume picks up where you left off — all previous messages, cell outputs, and mode are restored from disk. Snapshots are saved incrementally, so you can resume even after a crash.
automatiq resume                 # Interactive picker (latest session pre-selected, Enter to resume)
automatiq resume mysession       # Resume by name (skips picker if unique match)
Note
Resume requires the original recording folder to still be in your current directory (the agent reads from both the history snapshot and the recording workspace).
You can send quick inline feedback directly from your terminal:
automatiq feedback "The agent struggles with shadow DOM selectors"Or omit the message to open the Interactive Feedback Box supporting rich multiline input:
automatiq feedback- Controls:
Enterinserts a new line.Alt+Enter(orEscapefollowed byEnter) submits your feedback.- Standard fallback: If
prompt_toolkitis not installed, it falls back to a line-by-line input box (pressCtrl+DorCtrl+Zon a new line to submit).
This sends your message (along with OS/version info) to the telemetry endpoint. No account or GitHub login required.
Running web automation and scraping scripts reliably requires high-quality proxies to avoid rate limits, IP bans, and CAPTCHA blocks. NodeMaven is our recommended provider.
Why NodeMaven?
- You get 99.9% uptime with sticky sessions lasting up to 7 days.
- All proxies have a fraud score under 97% while requiring No KYC for registration.
- You can earn up to 10% cashback on the data you use.
🎁 Special codes for AutomatiQ users:
AUTOMATIQ35- 35% off Mobile and Residential ProxiesAUTOMATIQ40- 40% off ISP (Static) Proxies
Maintaining this open-source project sustainably is made possible thanks to our sponsor, NodeMaven.
AutomatiQ relies on LiteLLM under the hood, meaning you can easily swap the default Gemini models for OpenAI, Anthropic, GitHub Copilot, or Local LLMs (like Ollama, LM Studio, or vLLM).
To change the default models on the fly, use the --model (for the Agent) and --recorder-model (for Vision compilation) flags.
If you are running a local inference server with an OpenAI-compatible endpoint, use the --base-url flag. You must prefix your model name with openai/ so LiteLLM knows to route it through the OpenAI protocol.
Example using Ollama (running locally on port 11434):
automatiq run https://example.com \
  --model openai/llama3.3 \
  --recorder-model openai/llava \
  --base-url http://localhost:11434/v1
For permanent configuration without CLI flags, see Configuration below.
Route the recording browser through an HTTP or SOCKS proxy — useful for testing geo-restricted content, avoiding IP bans, or recording through rotating residential proxies.
# One-off: pass a proxy URL for this recording
automatiq record --proxy socks5://127.0.0.1:1080 https://example.com

# One-off: force a direct connection (overrides config)
automatiq run --no-proxy https://example.com
For permanent configuration, edit ~/.automatiq/config.toml:
[recorder_proxy]
enabled = true
server  = "http://user:pass@host:3128"   # or socks5://host:1080
# provider = "myproxies:rotate"          # dynamic "module:callable" for rotating proxies
Tip
Looking for a reliable proxy provider? Our sponsor NodeMaven offers 99.9% uptime residential & ISP proxies — use promo code AUTOMATIQ35 (35% off Mobile/Residential) or AUTOMATIQ40 (40% off ISP/Static).
Dynamic provider: The provider field is a "module:callable" string. At launch, AutomatiQ imports the module and calls the function (no arguments) to get a proxy URL. This lets you plug in rotating proxy services without hardcoding a single IP. The module just needs to be importable (place it in your working directory or on PYTHONPATH).
# myproxies.py — a minimal rotating provider
import requests

def rotate() -> str:
    requests.get("http://127.0.0.1:8000/rotate", timeout=30)
    return "http://127.0.0.1:3128"
Precedence: --no-proxy > --proxy URL > provider > server. If the provider fails or returns nothing, AutomatiQ falls back to server. This only routes the recording browser's egress — LLM API calls, blocklist downloads, and agent tool HTTP are unaffected.
| Phase | Key | Action |
|---|---|---|
| Recording | Ctrl+C |
Stop recording and save session |
| Compilation | Esc |
Skip AI analysis for remaining segments |
| Compilation | y / n |
Confirm or deny the skip prompt |
| Agent | q |
Quit the agent session |
| Agent | Esc |
Cancel current LLM call or code execution |
Note: Ctrl+C force-quits the application at any phase.
| Flag | Description |
|---|---|
--target PATH |
Path to a specific session folder to run the agent on |
--name NAME |
Custom name for the session folder (record and run only) |
--model MODEL |
LiteLLM model string for the agent |
--recorder-model MODEL |
Vision model for video-clip analysis |
--base-url URL |
Custom OpenAI-compatible API endpoint |
--max-steps N |
Maximum agent loop iterations (default: 100) |
--sandbox-timeout SEC |
Seconds per IPython cell (default: 60) |
--output-dir PATH |
Root directory for all output (default: ./output) |
--proxy URL |
Route the recording browser through a proxy (record and run only) |
--no-proxy |
Force a direct connection, overriding config (record and run only) |
--no-banner |
Skip the startup animation |
--no-telemetry |
Disable anonymous usage telemetry for this run |
--verbose |
Show detailed diagnostic output |
-V, --version |
Show version |
-h, --help |
Show help message |
On first run, AutomatiQ creates ~/.automatiq/config.toml with commented defaults. Edit this file to permanently override models, custom endpoints, timeouts, and recording settings.
[models]
agent    = "gemini/gemini-3.5-flash"
recorder = "gemini/gemini-3.1-flash-lite"
# base_url = "http://localhost:11434/v1"   # Uncomment for Ollama / LM Studio / vLLM

[agent]
max_steps       = 100
sandbox_timeout = 60

[recording]
fps                   = 3
segment_pad           = 2
merge_gap_threshold   = 1.5
max_frames_per_prompt = 8

[recorder_proxy]
# enabled  = false
# server   = "http://user:pass@host:3128"
# provider = "myproxies:rotate"   # dynamic "module:callable" for rotating proxies

[telemetry]
enabled = true
# endpoint = "https://api.automatiq.run/v1/telemetry"   # change only if self-hosting
Priority order: CLI flag > ~/.automatiq/config.toml > built-in defaults.
AutomatiQ collects anonymous usage-volume telemetry to help detect crashes, understand feature adoption, and improve the tool. Telemetry is enabled by default (opt-out).
What we collect:
- OS, Python version, AutomatiQ version
- Which command was run (
record,agent,run,resume,feedback) - Session duration, step counts, token usage, cell executions
- Recording metrics (request counts, WebSocket frames, browser used)
- Error types (exception class and module — not full stack traces)
- Session outcome (success, abandoned, step-limit-reached, crash)
What we NEVER collect:
- No URLs, domains, or file paths
- No generated code or IPython cell contents
- No prompts, LLM responses, or shell output
- No persistent identifiers — a random
run_idis generated in memory per run and discarded when the process exits - No IP addresses are stored client-side (server-side handling is your responsibility if self-hosting)
Opting out:
# Per-run: pass the flag
automatiq --no-telemetry run https://example.com

# Permanent: edit ~/.automatiq/config.toml
[telemetry]
enabled = falseAutomatiQ is managed using uv.
# Clone and setup environment
git clone https://github.com/StoneSteel27/AutomatiQ.git
cd AutomatiQ
uv sync

# Run the project from source
uv run automatiq run https://example.comDevelopment dependencies (pytest, ruff, pre-commit, etc.) are installed automatically via uv sync. This ensures ruff, build, twine, pytest, and pre-commit hooks (lint + format on every commit) are properly configured in your isolated environment. To set up the git hooks:
uv run pre-commit installRun tests:
uv run pytestMIT